Project introduction

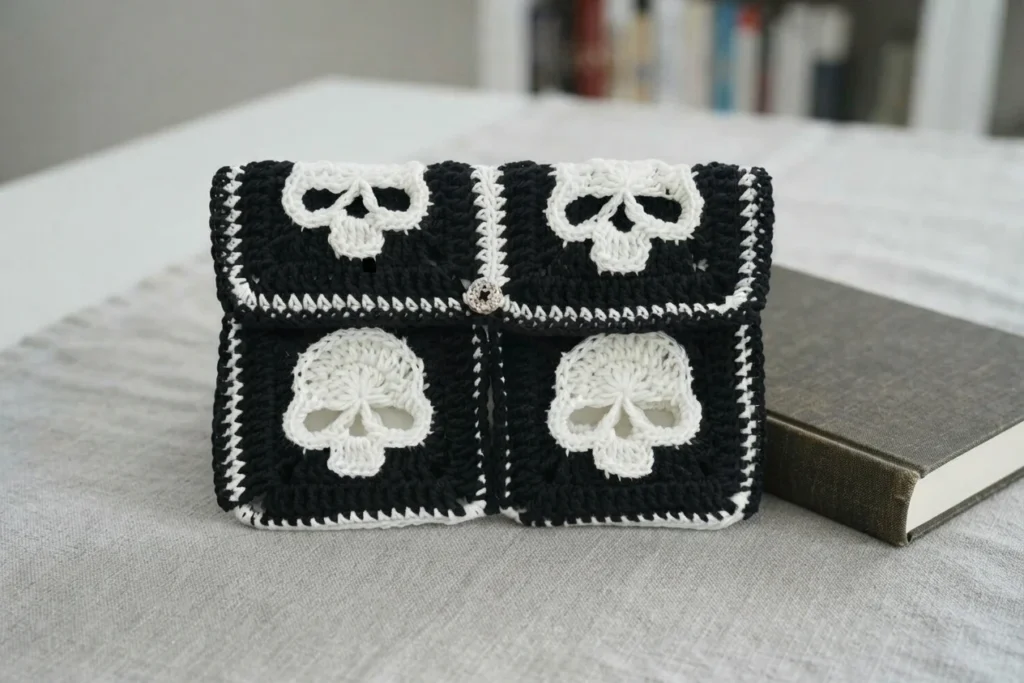
This article is a pattern overview, not a full tutorial. It explains how a Solid Skull Granny Square becomes an envelope style sleeve with a fold-over flap and a button closure, made to help protect a book or tablet. For the complete working pattern, use Original designer’s pattern and instructions from GrannySquare.me, the source website for this design, especially during the Halloween season.
Materials
Gather the full kit before you start so you can move from making squares to joining and seaming without stopping to search for notions. The sample uses cotton yarn, while the source leaves the general yarn choice to you within the two color plan shown below.
- Yarn of your choice in 2 colors, with cotton yarn used for the sample
- Crochet hook, 4.00 mm
- Darning needle
- Scissors
- One button
Gauge
Size matters here because individual squares build the finished sleeve, so a motif that runs large or small can affect how comfortably a book fits. Compare your first square and the finished piece with the source measurements below before relying on the fit.
| Measurement | Source size |
|---|---|
| Single Granny Square | 4.53 by 4.53 inches |
| Book Sleeve length | 9.33 inches |
| Book Sleeve width | 5.91 inches |
Abbreviations (US Term)
The pattern uses a short set of US abbreviations. Keep this glossary nearby while you work, especially for the terms that describe joining stitches together and increasing, because those ideas appear in the edging, seaming, and flap stages.
- ch: chain stitch
- dc: double crochet
- sc: single crochet
- st: stitch
- tog: together
- inc: increase
Solid Skull Granny Square

The sleeve begins with the designer Solid Skull Granny Square, the motif that creates the bold skull shapes across the finished piece. Make 6 skull squares, then return to the sleeve assembly. The source also notes a collection of 9 Skull Granny Squares Patterns in different styles, so a maker could choose a favorite skull design before committing to the full set of squares.
Join Method
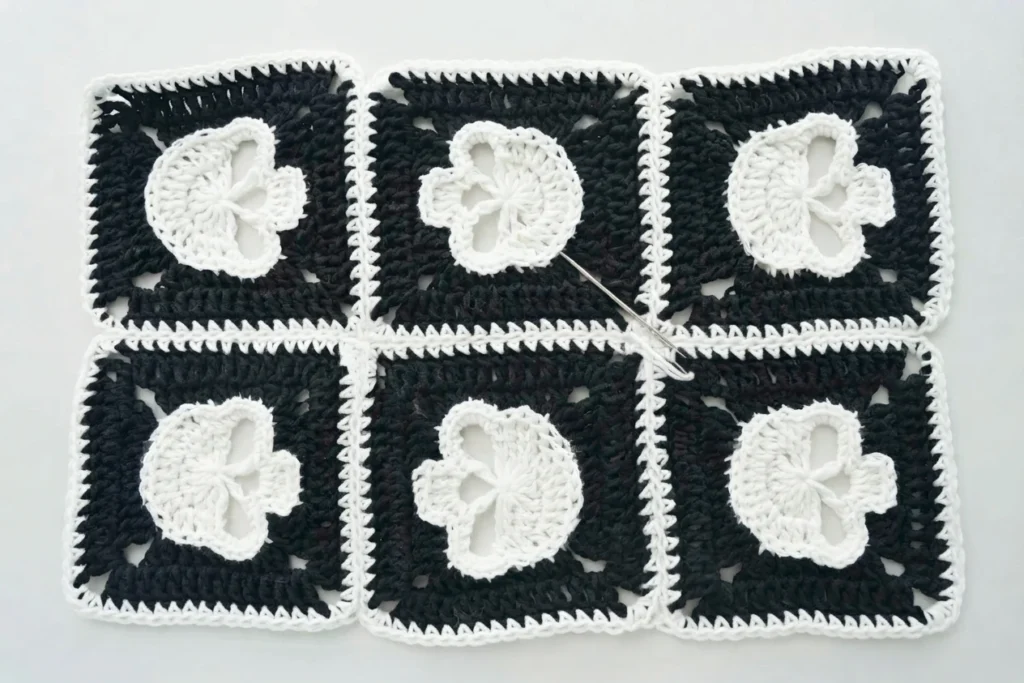
The squares are connected with the Thread Needle Join Method, chosen because it gives a neat, flat seam. Layout deserves extra attention before you join anything permanently. Following the arrangement shown by the designer keeps the skull motifs right-side up on both sides of the panel, which avoids finishing the whole sleeve only to discover that the motifs on one face are upside down.
Edge the Sleeve Opening
Once the panel is joined, the left side becomes the opening. That edge is worked with three rows of double crochet. Where corners from two pieces meet, double crochet decreases help the edging sit neatly instead of flaring or pulling at the joins.
Row 1
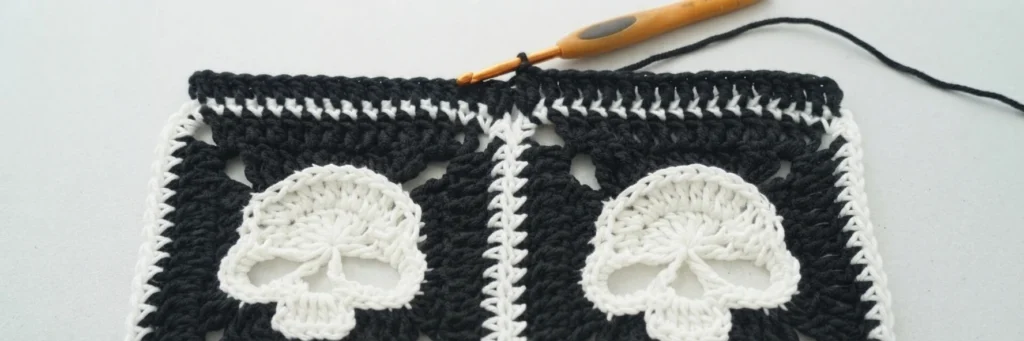
The first edging row starts by adding new yarn in the middle single crochet of the 3 corner single crochet on the right side. A chain of 3 stands as the first double crochet, followed by 1 double crochet in each stitch along the edge. At a place where two squares meet, the row uses a double crochet, a double crochet two together, and another double crochet to handle the join.
Rows 2-3

The next two rows repeat a simple turn, a chain of 3 counted as 1 double crochet, and 1 double crochet in each remaining stitch. After row 3 is complete, the yarn is fastened off, leaving the opening with a firmer double crochet band ready for folding and seaming.
Seam the Book Sleeve
Seaming turns the flat joined panel into a pouch. A round of single crochet is worked around the entire edge, and that single round does two jobs at once: it seams the sides into the main body and creates a finished border. Corners and joins receive special handling so the shape turns smoothly and stays flat.
Step 1-Fold

Place the panel with the wrong side facing up. Fold the opening edge over to form the main body of the sleeve. Taking a moment here to confirm the fold position helps the later seaming follow the intended shape of the pouch and flap.
Step 2-Side Seam of the Pouch

The side seam starts at the bottom right corner, with new yarn added through both layers. A chain of 1 acts as a standing stitch, then single crochet continues through both layers to join the squares up to the opening edge. Around each of the three double crochet posts, work 2 single crochet while still keeping the join through both layers.
Step 3-Flap and Finish

For the flap, work 1 single crochet in each stitch along the edge, with a single crochet increase in each of the two middle corner stitches and a single crochet two together at the junction where two squares meet. Work the left side seam in the same way as the right side, then fasten off to finish this stage.
Button Closure

The closure combines a crocheted tie with the single button from the materials list. Make a chain long enough for the tie, about four times the width of your folded sleeve, and leave long tails at both ends. Fold the tie in half, attach its ends at the center of the flap edge, and sew the button in that same spot.
Granny Square Book Sleeve Video

The source also offers a video for makers who prefer to follow along visually. Watching the assembly while you hold your own panel can make the fold, seam placement, and flap formation easier to understand before you commit to the final stitches and closure.
Granny Square Book Sleeve-Printable Pattern Overview
The printable listing describes a bold black and white book sleeve with skull granny square motifs, a contrasting border, a fold-over flap, and a button closure. On the source page, print and pin options sit with that listing, making this section a quick visual summary of the finished design rather than a separate project.
- Crochet Star Granny Square Bag Pattern (Pattern): Pattern Overview
- Mushroom Book Sleeve Crochet Pattern 🍄: Pattern Overview
Materials
The printable version confirms the same short kit covered in the main Materials section: yarn in 2 colors with a cotton sample, a 4.00 mm hook, a darning needle, scissors, and one button. Check that list once before printing so nothing is missed.
Solid Skull Granny Square
In the printable pattern, the skull motif itself is summarized as a five round square that begins with a magic loop. Its construction includes color changes, and one middle round is worked in the third loop only after new yarn is added. The final round begins with new yarn in a corner and finishes the motif with a single crochet edge before fastening off, giving each square a tidy border for joining.
Join Granny Squares
This short printable instruction confirms the joining choice in one line: the finished squares are joined with the thread needle join method. That matches the main Join Method section, where the benefit described is a seam that stays neat and flat across the panel.
Edge the Sleeve Opening
The printable edging repeats the three row approach for the opening. New yarn starts in the middle single crochet of the 3 corner single crochet on the right, a chain of 3 counts as 1 double crochet, and each stitch along the edge receives 1 double crochet. Decreases handle the points where squares meet, rows 2 and 3 repeat the basic row, and the work is fastened off after row 3.
Seam the Book Sleeve
The printable seaming summary follows the same fold first logic. The panel sits wrong side up, the opening edge folds to create the body, and single crochet through both layers forms the side seams starting from the bottom right corner. Along the flap edge, increases sit in the middle single crochet of the two 3 corner single crochet groups, decreases sit at square junctions, the left seam mirrors the right, and the yarn is fastened off.
Button Closure
The printable closure is the same tie and button finish described earlier. A chain sized at about four times the width of the folded sleeve, made with long tails at both ends, is folded in half and attached at the center of the flap edge, with the button sewn directly in that spot to complete the sleeve.