
Project introduction
This pattern overview introduces the Lamb Pocket Pet by Virkadia, a small springtime lamb amigurumi and part three of three in the Easter Pocket Pets collection. It is presented here as inspiration and a planning guide, not as a full tutorial. For the complete instructions, use the Original designer’s pattern and instructions on Virkadia.
Pattern Information | Free Crochet Lamb Amigurumi
Virkadia rates this project intermediate. The finished sample measures 5.5 inches in height by 5 inches in width by 2.5 inches in depth. Those dimensions come from a model made with medium weight yarn, a size H-8 (5 mm) hook, the YU/YO method, and a gauge of 18 sc x 21 rows = 4 inches. Changing yarn weight or hook size can make the lamb larger or smaller. The web pattern is free, and an ad-free PDF download is also available for purchase, so free web access does not mean every format is free.
Supplies
Gather the full source-listed checklist before starting so the small pieces, face details, and assembly can be completed without substitutions mid-project.
- Size H-8 (5 mm) crochet hook
- Medium (4) weight yarn in 3 colors: Yarn A, white, with the example using Red Heart Super Saver in Soft White; Yarn B, gray, in Dusty Gray; Yarn C, dark gray, in Charcoal
- 10 mm black safety eyes, 2 pieces
- Black embroidery floss
- Polyester fiberfill
- Yarn needle
- Scissors
- Stitch markers
Alternate Yarn Supplies
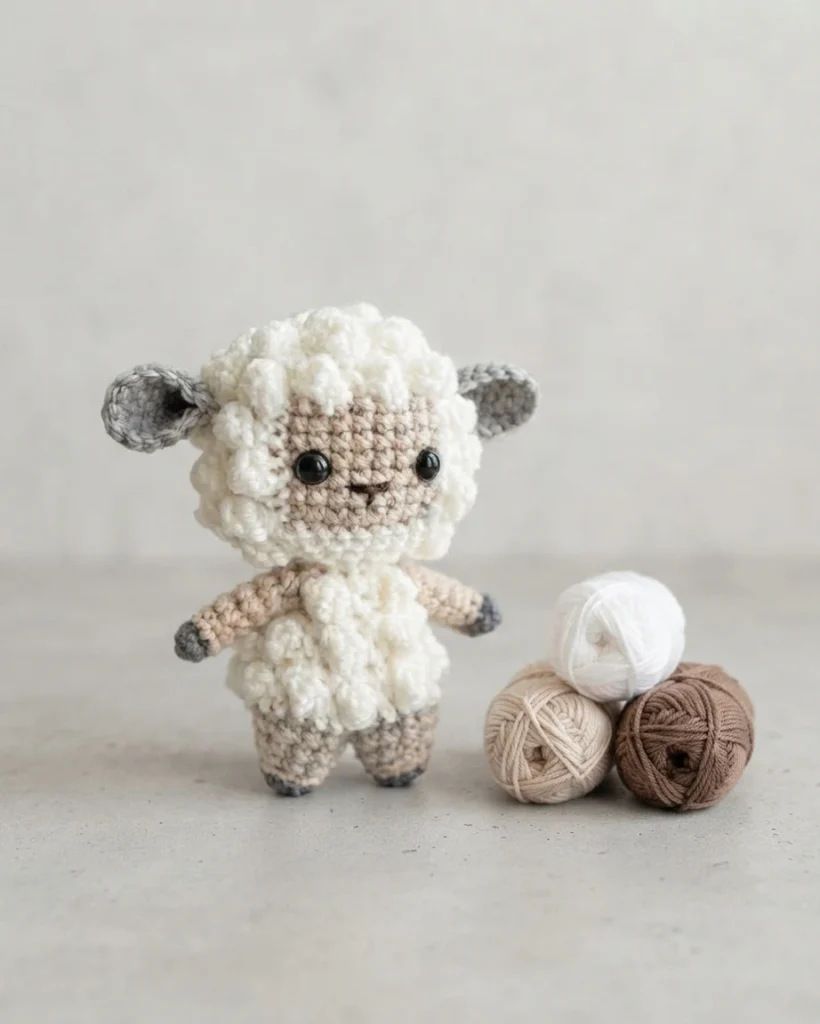
The source also shows a second color variation using the same white for Yarn A, while Yarn B changes to beige, with the example using Red Heart Super Saver in Buff, and Yarn C changes to brown, with the example using Red Heart Super Saver in Cafe Latte. This option keeps the same construction and three-color structure while giving the lamb a warmer, softer contrast for the ears, face, arms, and legs.
Terminology
The pattern uses English US terminology. Its glossary lists st (sts) for stitch (stitches), ch for chain stitch, sl st for slip stitch, sc for single crochet, sc2tog for single crochet 2 together over 2 stitches, also described as a decrease, sc3tog for single crochet 3 together over 3 stitches, pc for 1 small popcorn stitch, and sk for skip. Abbreviations are attached to a number, such as 1sc or 2sc, and that number shows how many of that stitch go into the same stitch.
Special Stitches
Review the special techniques before beginning because several are specific to how this lamb is shaped and textured. The listed tutorials cover the single crochet YU/YO method, invisible decrease, joining rounds, changing colors mid-round, and the small popcorn stitch. Work is done in the round, with each round joined by a slip stitch. Unless told otherwise, the first stitch of the next round goes into the same stitch as the joining slip stitch, and the right side should face outward.
Single Crochet (YU/YO Method)

This pattern uses a variation of single crochet often called the YU/YO method. On the first pass of each stitch the yarn is taken under instead of over, then the stitch is finished with a yarn over as usual. The source explains that this creates a slightly tighter, stiffer fabric, helps reduce holes and stitch slanting, and improves shaping. The method is optional, but it is highly recommended here to help keep the edges of the lamb face from slanting.
Changing Colors (Mid-Round)
A mid-round color change creates the bold face area. The change begins in the stitch just before the stitch that should appear in the new color, with the final pull through completed using the new color. Dropped yarn can float along the back or inside of the work until it is needed again, or it can be worked over as you go. Keep floats from pulling too tight. Another source option is to leave slack, then later cut those strands and tie them together in pairs.
Small Popcorn Stitch
The small popcorn stitch gives the white wool its raised texture. Unlike the more common version that uses 5 double crochet stitches, this variation uses only 3 double crochet stitches worked into the same stitch. The working loop is then drawn through the top of the first double crochet in that small group to form the bump. Read the designer instructions carefully before starting, because the source notes that this stitch is unique for this lamb pattern and affects rounds throughout the head and body.
Construction Overview | Free Crochet Lamb Amigurumi
The lamb is built in separate joined-round pieces and assembled at the end. Ears are made first and set aside, the head is worked partway before the ears, eyes, and nose are added, and the head is then closed. Arms and legs are made in pairs, the legs are joined to begin the lower body, the body is finished and connected to the arms, and finally the head is sewn to the body.
Crochet Lamb Ears - Rounds 1 to 3
Each ear is a small three-round piece worked in Yarn B, starting with a magic ring, or with the source alternative of ch 4 and joining with a slip stitch to form a ring. The rounds increase into a triangular shape. After the third round, Yarn B is fastened off with a tail left for sewing, and the ear is set aside. The same three rounds are repeated for the second ear before work moves on to the head.
Crochet Lamb Head - Rounds 1 to 13
The head begins in Yarn A with a magic ring, or the same ch 4 ring alternative, and grows through joined rounds that mix plain single crochet with small popcorn stitches for wool texture. From round 7 onward, Yarn B is introduced in repeated mid-round sections to form the face, while Yarn A continues around the rest of the head. By round 13 the width is maintained while the face section is completed.
Secure the working loop with a stitch marker at this pause point, fasten off Yarn B if desired, and tidy color-change ends inside, because the rest of the head uses Yarn A only.
Attaching Ears
Before attaching, turn the head so the beginning rounds face upward and the last round is at the bottom. Fold each triangular ear so the corner stitches on either side of the end tail align, placing the tail at one end of the folded edge. The openings should face forward with the face, which sits on the flattest side of the head. Sew the first ear along its folded edge between rounds 7 and 8, about 4 stitches from the color-change edge toward the back, secure it inside, then mirror the second ear on the other side.
Adding Eyes
Insert both safety eyes through the center front of the head. The front is the flattest side noted for ear placement, a quarter turn before the joining seam. The source places the eyes between rounds 10 and 11, sitting 6 stitches apart. Check the spacing and symmetry from the front before securing them, because this position works together with the embroidered nose below to define the face.
Adding Nose
The nose is embroidered with black embroidery floss between rounds 11 and 12, centered between the eyes and 2 stitches wide. A short vertical line below it extends down to end between rounds 12 and 13 and is 1 round tall. The source builds the horizontal nose with repeated passes for bulk, then forms the line down from its center. Finish by tying the ends together gently inside the piece, taking care not to pull the embroidery threads too tight.
Crochet Lamb Head - Rounds 14 to 16
Remove the stitch marker and continue the head in Yarn A, beginning to stuff as you go. The final three rounds reduce the opening through a mix of popcorn stitches, single crochet, sc2tog, and sc3tog shaping, moving from the wider head to a small closing round. When round 16 is complete, fasten off Yarn A and leave a short tail for tying. Add enough fiberfill before the opening becomes too small to shape the head comfortably.
Crochet Lamb Arms - Rounds 1 to 8
Each arm starts in Yarn C with a magic ring, or the ch 4 ring alternative, for the darker lower section, then changes to Yarn B after round 2 by pulling up a loop in the last stitch and tying the tails together inside. One round uses slip stitches, the next works in the back loop only, and the remaining rounds are plain joined rounds that keep the narrow arm shape. Fasten off, set the arm aside, and repeat all eight rounds for the second arm.
Crochet Lamb Legs - Rounds 1 to 6
Both legs follow the same six-round structure. Each begins in Yarn C, changes to Yarn B after round 2 in the same way as the arms, includes a slip stitch round, and then increases through a back-loop round and two further rounds to widen the foot and leg. Leg 1 is fastened off with a longer tail of about 8-12 inches left for sewing the inside join later, while leg 2 is fastened off with a short tail for tying.
Joining Legs (Round 7)
Round 7 joins the legs using Yarn A, which is pulled up in the first stitch of leg 2 and secured by tying its tail to the Yarn B tail inside. Stitches are worked around part of leg 2 and then part of leg 1, skipping the inner 3 stitches of each leg. Pause with the working loop secured, then use the long tail from leg 1 to sew the inside slit closed. The source advises sewing 5 pairs of stitches in total, including the pairs at each side of the unworked section.
Crochet Lamb Body - Rounds 8 to 13
The body continues from the joined legs in Yarn A, alternating shaping rounds with popcorn texture rounds that echo the wool on the head. Decreases narrow the body over rounds 9 and 11, while round 12 adds two popcorn stitches at the front. In round 13 the flattened tops of both arms can be worked together with the body stitches to attach them in place.
If that method is difficult, the source offers an alternative: work a plain single crochet round and sew the arms on separately with Yarn A between rounds 12 and 13. Fasten off with a long tail, about 3 ft, for sewing.
Sewing Together
Place the head on top of the body in the direction you prefer and use the long body tail to sew around the full circumference where the two pieces meet, working stitch by stitch. If the crevice between head and neck is hard to reach, the source suggests sewing loosely at first to leave room to maneuver, completing the full circle, and then tightening each strand in the same sequence it was sewn. Secure the sewing to the head tail or a nearby stitch, trim, and weave in excess.
Conclusion | Free Crochet Lamb Amigurumi
Finished, this free Lamb Pocket Pet makes a compact spring companion and completes the three-design Easter Pocket Pets set alongside the Chick Pocket Pet and the Bunny Pocket Pet. Use the designer link in the introduction for the full row-by-row pattern before you begin, and keep this overview for planning supplies, techniques, and assembly order. For another lamb project to compare, see Crochet lamb / sheep pattern by Halime Özel: Pattern Overview.


