
Project introduction

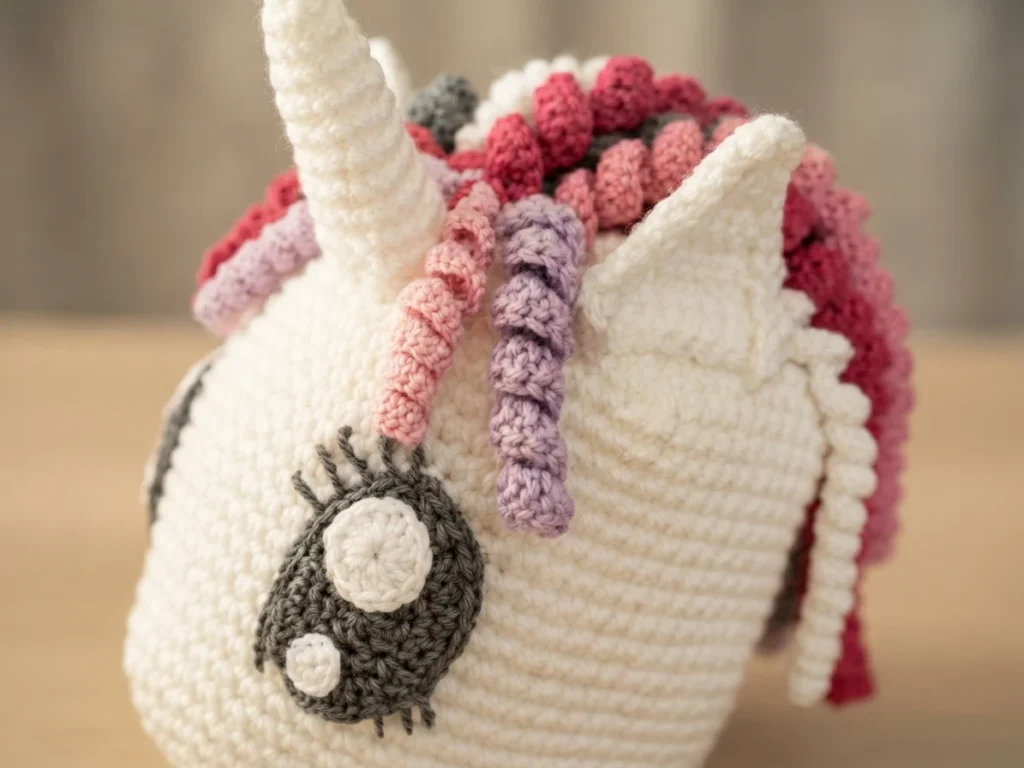


This is a pattern overview, not a full tutorial, for a playful My Little Pony themed crochet hat. It explains what the project includes, how the pieces fit together, and how to prepare, so you can decide whether it suits your skill level and the wearer you have in mind. For the complete written instructions, follow the Original designer’s pattern and instructions on the original designer’s page.
The source describes the written pattern as free and as very easy to follow, and it is presented as suitable for beginners. It also covers a wide range of wearers, with guidance for sizes from babies to adults, which makes it a flexible choice when different family members want a matching character hat. The project is also described as not very time consuming, so it can be a practical seasonal make when time is short.
The finished look is built from a white crown with ear flaps, plus separate character details that give the hat its pony identity. Those details include two grey eyes, two large white dots, two small white dots, one white horn, and two white ears. A set of curls forms the hair, with 15 longer curls and 4 fringe curls in the designer’s sample, and those curls are what soften the shape and make the character easy to recognize.
Construction begins at the center of the crown and works outward in circular crochet, with each round joined and work continuing in the same direction rather than turning. The ear flaps are then worked back and forth, which changes the rhythm of the project and gives a clear shape for covering the ears. Eyes, dots, and the horn are also worked in circular crochet, while the ears are worked back and forth, so each piece keeps its own simple starting method and direction.
Yarn choice remains flexible in the original description, including the option to use yarn already on hand, and that flexibility helps when you want to match colours you already own or keep the project low cost. Before starting, read the overview below, check the abbreviations, and measure the intended wearer, because the sizing method depends on that measurement rather than on one fixed size for everyone.
Pattern format and preparation
This overview follows a free written pattern in US crochet terminology, and it is intended as a guide to the project rather than a replacement for the designer’s full instructions. If any detail seems unclear while you work, return to the original designer page linked above and follow that version, because it remains the authority for the exact wording and order of the steps.
- Soft acrylic yarn, 150g in total for the designer’s sample, including 50g white
- H/5mm hook
- 2mm hook
- E/4mm hook
- Tapestry needle for sewing pieces together
The abbreviations below use the designer’s US terms, and keeping this short reference nearby can make the written pattern easier to follow. The list is not a lesson in each stitch, but it removes the need to guess what a short form means when you move from the crown to the smaller character pieces.
| Abbreviation | Meaning |
|---|---|
| MR | Magic ring |
| st. | stitch |
| slst. | slip stitch |
| ch | chain |
| sc | single crochet |
| hdc | half double crochet |
| dc | double crochet |
| *()* | repeat what’s in the brackets |
| tog. | together |
| prev. | previous |
| rd. | round |
| rw. | row |
| rep. | repeat |
Sizing starts with a head measurement, not with an assumed standard size. Measure around the head, then divide that measurement by 3,14 to find the point where increases should stop. In the designer’s example, a head measuring about 50cm/20″ around gives about 16cm/6,4″, and the hat shown reached that point at round 11. Use your own measurement in the same way, rather than copying the sample result for a different wearer.
Several pieces allow a choice while keeping the character of the hat. The horn in the sample is about 7,5cm/3″ tall at the point where the designer stopped, and it can be continued for a taller horn. The ears can also be continued in the same way for larger ears. For the curls, the first curl acts as a guide, with longer curls using ch 40-60, shorter curls using 30-40, and fringe curls using 15-20, so length can be adjusted to suit the wearer and the look.
Allow unhurried time for the final stage, because arranging and sewing the pieces together is described as taking a little time and patience. Once the pieces are placed and sewn, work a round of sc around all of the hat and the ear flaps to finish the edge. That final round helps the separate details sit as one finished hat, rather than as a collection of loose shapes.


1 thought on “My Little Pony hat - written: Pattern Overview”